Record lectures for online and hybrid classes to expand the learning methods available to students. Audio files can also be used in creative ways to enhance students' experience, and to offer supplementary material that only exists in an audio format.
Moodle will natively play the following audio file formats:
.mp3 / .aac / .flac / .m4a / .oga / .ogg / .wma (Windows Media Audio)
Please note, if you want the sound file to play within its own player (embedded) within the Moodle course, then choose the mp3 format. The others will not work.
The Different Ways to Display Audio Files
- Linking to a Sound File
- If your audio file is hosted elsewhere online you can simply link to the relevant page.
- Add a resource>URL and pasting in the relevant link given you by the site.
- Uploading Audio for Students to Download
- Choose this option if you wish to upload your sound file to Moodle and give users the option to download it to their own computers.
- Choose Add a resource> File
- Note that the way the audio will display depends on the software the user has on their own computer. This could mean that some students might be unable to access your audio.
- Embedding a Sound File in its own Player
- Moodle includes a built-in mp3 player. If the relevant multimedia plugin filter is enabled within the course, sound files embedded into the text editor will play inline.
- Anywhere that Moodle's text editor is available, it is possible to embed a sound file, for example in a label or a page, a course topic summary, a quiz description or a lesson. The next section explains how:
Embedding Audio Content
- In the top right hand of your course, toggle Editing mode on
- Scroll down to the week you want to add content too, and click on Add an Activity or Resource then choose a resource or activity you want to make this file available to your students in.
- There are two ways to upload files to Moodle.
- In a text box:
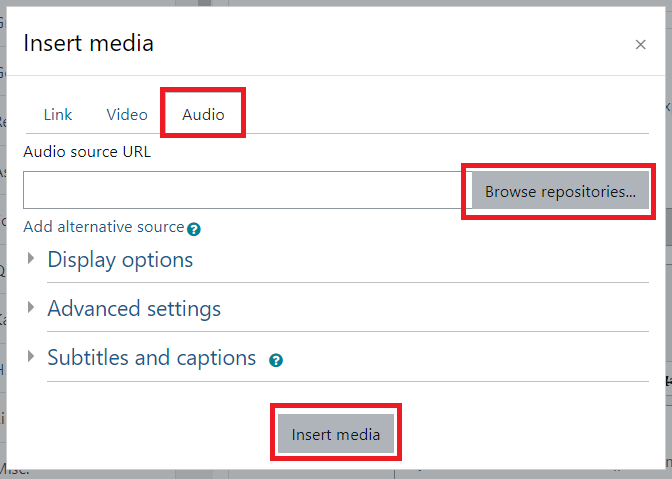
- Click on the Media icon.
- Select the Audio tab from the top of the Insert Media window.
- Click Browse repositories...
- Choose where you want to pull the sound file from. Once you found the file, click on the Upload this file button at the bottom of the window.
- Click Insert Media.
- Click on the Media icon.
- You can also upload the file directly to the Course Page:
- Click on Add an Activity or Resource then choose File in the list of resources.
-
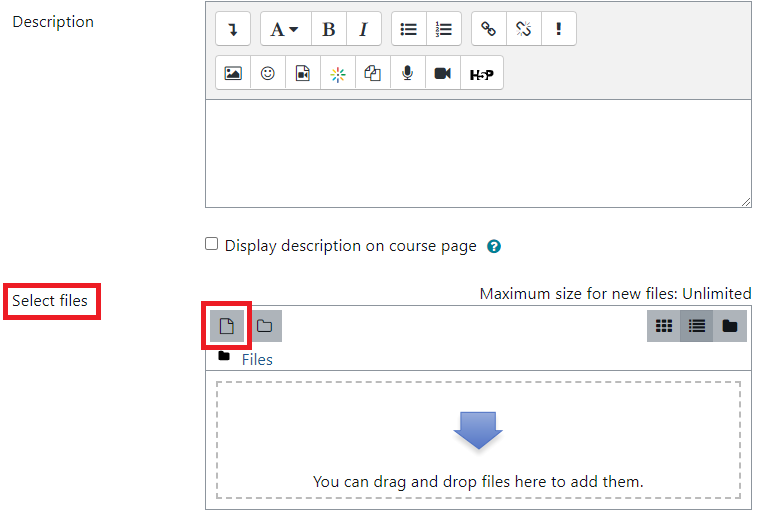
Select the File by clicking Add File, or by using the dropbox area, right below the Description.
- Once the file is uploaded to that box, the name of the file will be written in blue.
- In a text box:
- Once you have finished uploading the file, scroll down to the bottom of the page and click on Save Changes
More information about how Moodle uses audio.
Audio Recorders available and features:
All recorders come with a USB adaptor cord to connect to your PC or iMac, which allows you to upload the MP3 audio files to your computer for editing and uploading to Moodle.
- RCA Digital Voice RP 5050: Records up to 8 hours of audio
Also takes 0.3 mp pictures and video - Olympus Digital Voice Recored VN-3100/VN-3100PC:
Records up to 11 hours, 40 minutes of high-quality audio - Sony IC Recorder ICD-BX700:
Records up to 30 hours of high-quality audio
Staff are free to check out any of the devices or ask for additional help incorporating audio into their Moodle course, in the ATC (CEN 208).
Contact Academic Technology
ATC Support Updates and Hours of Operation The ATC is closed to in-person assista...
ATC Support & Hours of Operation
Weekday Support, Monday - Friday
- Phone (voicemail only): 541-463-3377 (8am-5pm)
- Email: atc@lanecc.edu (8am-5pm)
- Find our updated hours and support options on the ATC Website
The ATC is open to in-person assistance. Support is available through the above remote options and on campus at CEN 208


